Facebook plans to stop supporting Conversion Pixels as soon as September 2016 and by the end of this year, it is expected to be entirely phased out. The old Facebook Conversion Pixel will be replaced with a new Facebook Pixel. If you advertise on Facebook, this means it’s crucial that you get the new Facebook Pixels properly implemented across your websites or online funnels.
To make this transition as painless as possible, here is a short summary of what is new about the Facebook Pixel and how it differs from the Conversion Pixel.
What is the new Facebook Pixel?
The new Facebook Pixel is a Universal Pixel, meaning that it’s the ONLY Pixel you’ll need to track Facebook data across your funnel. In other words, there are no longer separate pixels for page view, leads, purchase, and etcetera. The Facebook Pixel tracks them all—and is up to 20% more accurate!
Although there is now only one pixel used to track page view, leads, purchases, etcetera (variables that Facebook calls ‘Events’), an additional line of code must be put into the pixel’s base code on appropriate pages to track these events.
What does this look like?
Here are 4 images to help make it clear!
1) New Facebook Pixel Code
[caption id="attachment_1250" align="aligncenter" width="620"]
 Standard Facebook Pixel[/caption]
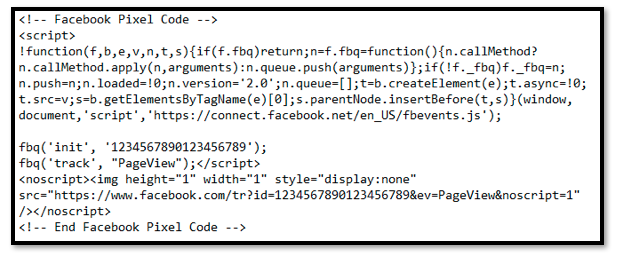
This is an image of the new Facebook Pixel's base code, which must be placed on EVERY page of your website. This base code will provide you with analytics such as page views and, just as important, it allows you to build remarketing campaigns, custom audiences, and look alike audiences.
Ideally this base code should be placed on each page of a website, but it’s crucial that it gets placed on each page of a funnel.
2) Tracking Number of Purchases
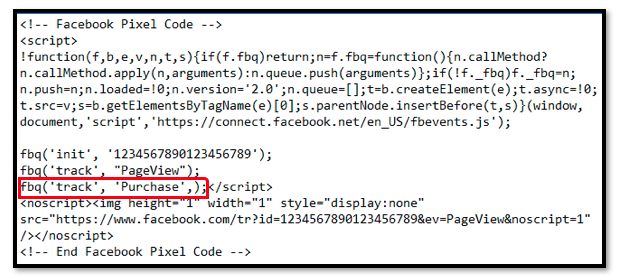
The Pixel as displayed above is only tracking Page Views. If you also want to track Number of Purchases then you need to use the same pixel and add an extra line of code that will track the Event called ‘Purchases’. This is what the code should look like:
[caption id="attachment_1251" align="aligncenter" width="621"]
 Facebook Pixel with Purchase Event[/caption]
3) Tracking More Than One Parameter
Similarly, if you want to track more than just one parameter on a page, the pixel remains the same, except for the modifications for Event Tracking. For instance, in addition to tracking Number of Purchases you may also wish to know the Value of Purchase. Also, many funnels have a ‘primary purchase’ (sometimes referred to as a ‘trip wire’) and many upsells. The purchase of a trip wire indicates a ‘unique sale’ but the value of the transaction is the sum of the price of the trip wire plus any additionally purchased upsells.
To track the Total Conversion Value (the value of the trip wire plus any purchased upsells), you still put the universal Pixel on the page but modify the Event Tracking.
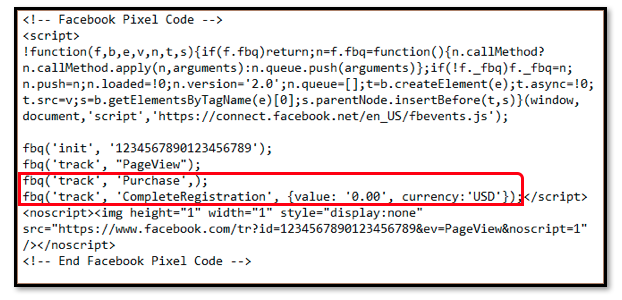
Therefore, on the Post-Purchase page (which is also the page hosting the first upsell) the pixel will look like this:
[caption id="attachment_1252" align="aligncenter" width="622"]
 Facebook Pixel with Purchase and Value Event Tracking[/caption]
Instead of simply tracking the Number of Purchases, you are now also tracking the value of the purchase. If each sale has a different value, you’ll need to get a developer to set up the pixel in a manner where ‘dynamic values’ can be passed back to Facebook.
4) Additional Event Tracking
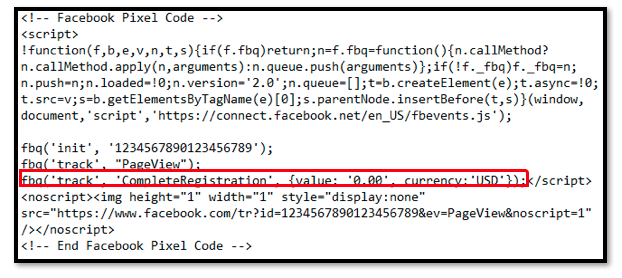
Each time an event fires, Facebook counts it as a type of conversion. Therefore, if the Pixel above (Facebook Pixel with Purchase and Value Event Tracking) is placed across all upsell pages, the Purchase Event will fire on each page and Facebook will recognize each instance as a unique sale, when in fact only one unique sale occurred with many line items.
It’s akin to checking out of a grocery store with multiple items on one receipt. You want the Purchase Event to be the ‘one receipt’ and the 'CompleteRegistration Event' to reflect the value of the many line items. Therefore, the pixel implemented on every additional page in the upsell part of a funnel will simply omit the Purchase Event, which will look like this:
[caption id="attachment_1253" align="aligncenter" width="622"]
 Facebook Pixel with Conversion Value Tracking[/caption]
The process we’ve just explored together will work for many purchase funnels. However, implementing Event Tracking for leads, or other micro-conversions is essentially the same.
The Facebook Pixel includes nine standard Events (though custom events can also be created).
How do you see the list of Standard Events?
Simply go into your account:
a) Click on Pixels
![]()
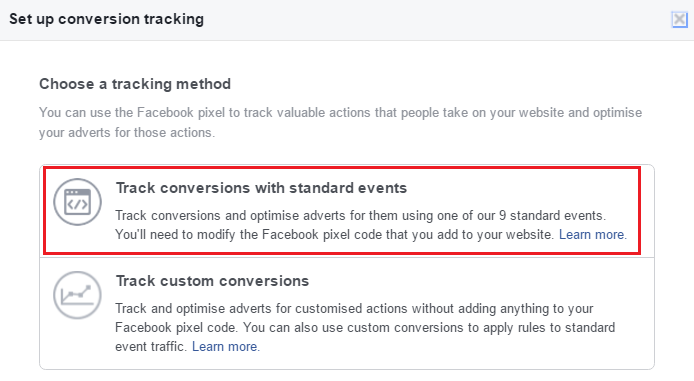
b) Click on "Track conversions with standard events"
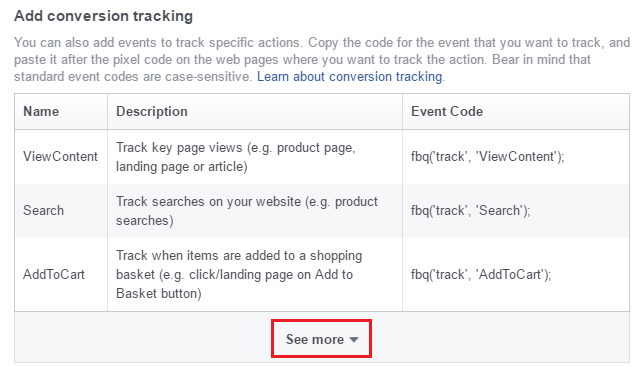
c) Click the down-arrow next to "See more" to view all available Standard Events
You will then be able to see all nine standard events:
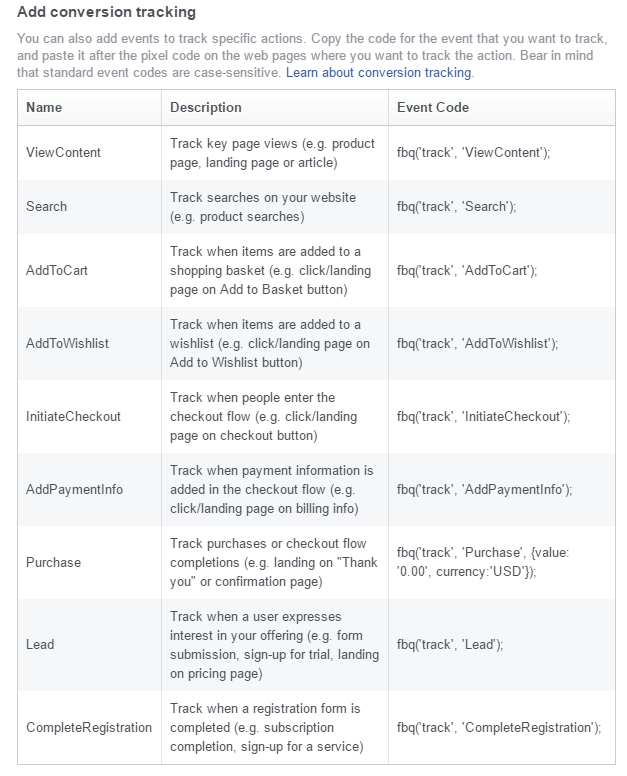
d) Copy and paste Event Code
All you need to do to modify the Facebook Pixel for Event Tracking, is to simply copy and paste the Event Code (far right column) into the appropriate place in the pixel.
I hope this guide helps those of you who are not well versed in coding to work with the new Facebook Pixel. There is no need for heart palpitations—do it once and you’ll discover the process to be fairly simple!
Questions? Feel free to leave a comment below!
 Twitter
 Facebook
 LinkedIn
